Minecraft Lantern Crafting for Beginners: An Easy Tutorial
Are you ready to light up your Minecraft world? You've come to the right place. In this quick and easy tutorial, you'll learn how to craft colorful lanterns to illuminate your builds and set the perfect mood. With just a few simple ingredients and a crafting table, you'll be well on your way to chasing away the darkness and setting a warm glow over your creations. Whether you want to line the path to your base, brighten up your garden, or add ambiance to your latest redstone contraption, lanterns are a must-have for any Minecraft home. What are you waiting for? Grab your crafting essentials and let's get crafting. By the end of this guide, you'll have a vibrant new light source to make your world shine. The night won't seem so scary anymore once you've lit it up in style!
On a side note, check out our article on the length of a day. Get a fighting chance to be preped and ready for the dreaded night.
Why Lanterns Are Useful in Minecraft
Lanterns are one of the best light sources in Minecraft! They emit a bright light level of 15, making them perfect for lighting up builds, caves, paths and more. Here are a few reasons lanterns are so useful:
- Brightness. Lanterns provide the highest light level of any light source in the game, alongside sea lanterns and glowstone. This makes them ideal for lighting up large areas or builds where you want maximum illumination.
- Placement versatility. Lanterns can be placed on the floor, ceiling or walls. You can attach them below or on top of blocks for creative lighting effects. This flexibility allows you to place lanterns in spots that best suit your needs.
- Durability. Lanterns last almost indefinitely once placed and lit. You don’t have to worry about them burning out like torches or campfires. Lanterns provide permanent, reliable lighting for your Minecraft world.
- Decoration. Lanterns add a decorative touch to any build. Their spherical shape and the warm glow they emit can enhance the ambiance and esthetics of your structures. Use lanterns to highlight architectural details or to simply spruce up empty spaces.
With their bright light, versatile placement options and enduring durability, lanterns are an invaluable resource in Minecraft. Light up your world and get crafting - you'll be glad you did! The possibilities for lighting and decorating with lanterns are endless. Your builds will never be dim again!
What You Need to Make Lanterns in Minecraft
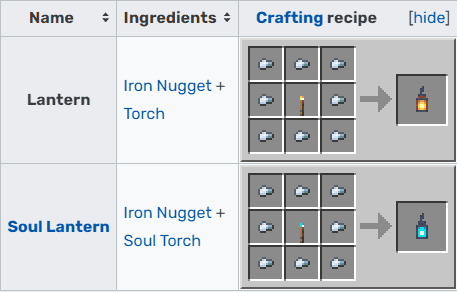
To make lanterns in Minecraft, you’ll need just a few basic ingredients. Gather up:
Iron Nuggets
 Eight iron nuggets are required for each lantern. You can obtain iron nuggets by smelting iron ore or iron ingots. If you don’t have an iron farm set up yet, don’t worry - iron is one of the most common ores in Minecraft, so you should be able to find some easily by caving or strip mining.
Torches (or Soul Torches)
 One torch or soul torch is needed in the center of the crafting grid to provide the light source for your lantern. Torches can be crafted from sticks and coal or charcoal. Soul torches require soul soil or soul sand instead of regular sticks. Either type of torch will work for crafting a lantern.
Optional: Glowstone Dust
 To make your lantern glow even brighter, add one piece of glowstone dust. This will increase the light level emitted by your lantern to 15, the maximum light level in Minecraft. Glowstone dust can be obtained by mining glowstone blocks in the Nether.
Now you have everything needed to craft a lantern! Place the torch or soul torch in the center of the crafting table, surround it with the 8 iron nuggets, and optionally add the glowstone dust. Remove your new lantern from the crafting output slot, and you’re ready to light up your world in style! Lanterns provide a stylish source of light that you can use to illuminate paths, gardens and more. Happy crafting!
How to Get Glowstone Dust for Crafting Lanterns
To craft lanterns in Minecraft, you’ll need glowstone dust, an essential ingredient. The good news is glowstone dust is easy to obtain. Here are a few ways to get your hands on this luminous material:
One of the simplest ways to get glowstone dust is by mining glowstone blocks found in the Nether. Just take your pickaxe and mine away at the bright yellow glowstone formations. Each block you mine will drop 2-4 glowstone dust. If you’re lucky, you may find an entire vein of glowstone to harvest!
Another option is to craft glowstone dust using glowstone blocks. Place a glowstone block in the crafting table grid and it will yield 4 glowstone dust. So if you have any extra glowstone blocks in your inventory or storage chests, turn them into dust for your lantern crafting needs.
You can also get glowstone dust as a drop from witches. Whenever you defeat a witch, there is a chance she will drop 0-6 glowstone dust upon death. While not the most reliable method, it can be a good way to get some extra glowstone dust if you happen to come across any witches.
Once you have your glowstone dust, you’re ready to craft lanterns. Place 8 glowstone dust in a ring shape on the crafting table, leaving the center block empty. This will yield 1 lantern. Lanterns provide a bright light source and can be placed on the floor, hung from ceilings or attached to walls. They're perfect for lighting paths, buildings, and any other area you want illuminated.
Happy crafting and let your lanterns light the way! The glowstone dust and lanterns you create will make exploring the Minecraft world bright and fun.
Step-by-Step Guide to Crafting Lanterns in Minecraft
Are you ready to light up your Minecraft world in style? Crafting lanterns is easy and will make your builds shine. Let’s get started!
Gather the Materials
You’ll only need a few basic items to make lanterns. Grab:
- 8 iron nuggets (made from smelting iron ore)
- 1 torch (crafted from coal and sticks)
That’s it! With these materials, you’ll be illuminating your world in no time.
Open the Crafting Table
Place your crafting table and open up the 3x3 crafting grid. This is where the magic will happen!
Add the Torch
Put your torch directly in the center square of the crafting grid. This will be the source of light for your new lantern.

Surround with Iron Nuggets
Now take those 8 iron nuggets and place one in each of the remaining squares of the crafting grid, surrounding the torch.
Craft and Place!
Once you’ve added all the ingredients, grab your newly crafted lantern from the crafting result box. Congrats, your lantern is ready to glow!
Place your lanterns around builds, paths and anywhere else you need stylish illumination. Lanterns can hang from the ceiling, sit on the floor or attach to walls. They’ll add ambiance to any structure and help light your way. Plus, their warm glow is much cozier than the harsh gleam of torches.
What are you waiting for? Get crafting and light up your Minecraft world with these chic lanterns. Your builds will never look brighter! Let your creativity shine.
Where to Place Lanterns in Your Minecraft World
Congratulations, you now have some shiny new lanterns crafted and ready to light up your Minecraft world! Now comes the fun part—deciding where to place them. You have lots of options for showcasing your handiwork.
Light up your paths
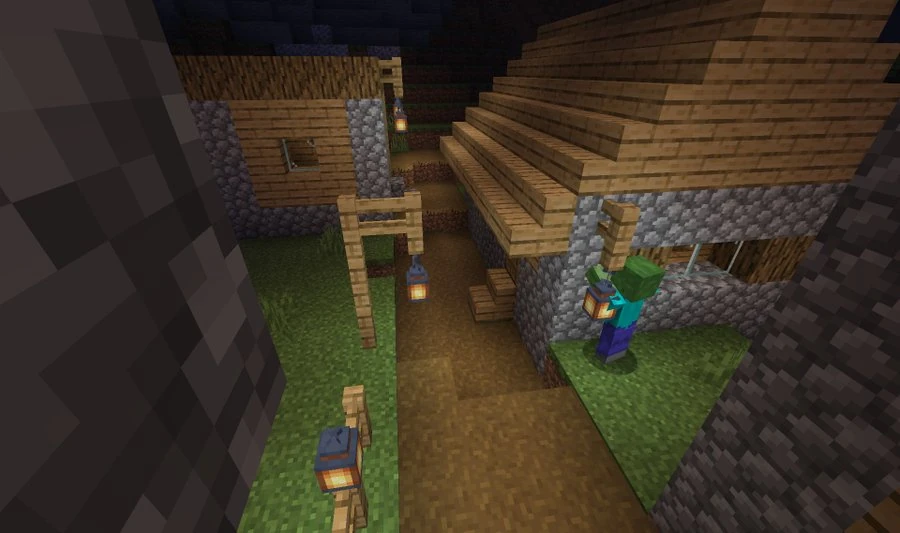
Place lanterns along walkways, trails, and paths to help guide your way in the dark. Hang them from fence posts or place them on top of short walls lining the path. This will make it much easier to navigate at night and prevent you from getting lost!

Decorate your buildings
Lanterns also make a great decorative accent for the outside of buildings. Hang them from overhangs, porches and entryways. You can also place them on top of exterior walls, pillars, roofs and staircases. Arrange them in a symmetrical pattern for an eye-catching display. The warm glow will make your buildings inviting and cozy.
Illuminate work areas
If you have any outdoor work spaces like farms, mines or docks, lanterns are ideal for keeping the area lit during nighttime activities. Place or hang lanterns around the perimeter of the space and at regular intervals in between. This will allow you to see what you're doing without the area feeling too dark or shadowy.
Guide visitors
Want to make it easy for new visitors to find your home base? Create a path with lanterns that leads straight to your main entrance or base camp. Start by the nearest landmark like a village or temple and space the lanterns about 10 to 15 blocks apart. This welcoming trail of light will lead newcomers right to your door!
The possibilities are endless for how you can use lanterns to illuminate your world. Get creative and think of other places where lanterns would be helpful or just make the area look nice. Your well-lit Minecraft world will be a sight to behold!
Conclusion
So there you have it, your very own lanterns to light up the night in your Minecraft world! Following this simple tutorial, you now have the skills and knowledge to craft basic lanterns that will illuminate your builds and adventures. The possibilities are endless - use them to decorate your home, pathway, or garden. Place them strategically to keep hostile mobs at bay. Gift them to your fellow players to spread the light. And speaking of sharing the brilliance, consider enhancing your multiplayer experience with a Minecraft game server.
With Minecraft Server Hosting, you can create a shared space for your friends to join you in admiring the luminance of your crafted lanterns. You can choose from various plans and features, ensuring a seamless experience for all. Whether it's illuminating your individual creations or collaboratively brightening up the Minecraft night, hosting your server opens up new avenues for creativity and camaraderie. So, however, you choose to use your new lanterns, let them not only light up your individual adventures but also be a beacon of shared enjoyment with friends. Nighttime in Minecraft just got a whole lot brighter thanks to you and your newfound multiplayer possibilities!


